What are Vira App Events?
Every time a WhatsApp message is sent or received through Vira App, it creates an "event" in HubSpot, think of it as a detailed record of message activity. This means you can analyse message patterns, track engagement across lifecycle stages, and measure the effectiveness of your WhatsApp communications(messages sent ,delivered, and failed) with all data that lives in HubSpot.
This guide will walk you through creating your first Hubspot custom report using Vira Whatsapp Event to help you better understand your contact interactions and messaging performance.
Getting Started with Vira App Events Reports
Step 1: To begin creating a report using Vira App Events:
- Navigate to extreme left side of your Hubspot page as shown below.
- Go to "Data Management" from list of icons in your HubSpot page.
- Click on "Event Management" in the left sidebar
- Select "App Events" from the available options
- Look for "Vira WhatsApp" in the list of "Apps" (integrated applications).
You'll now see all the WhatsApp message events tracked by Vira, including message sends, receives, and other interaction types.
Step 2: Configure Report Settings
-
Select the event type you want to report on (e.g., "Message Sent" or "Message Received")
- Hover over the event type ,click on "Actions" and select "Use in" and then select "Custom report Builder"
- In the Hubspot Custom Report Builder section add more data sources(Objects - Contact/companies) as primary data source is App Events.And you will see measures/properties of Hubspot under the selected data source.
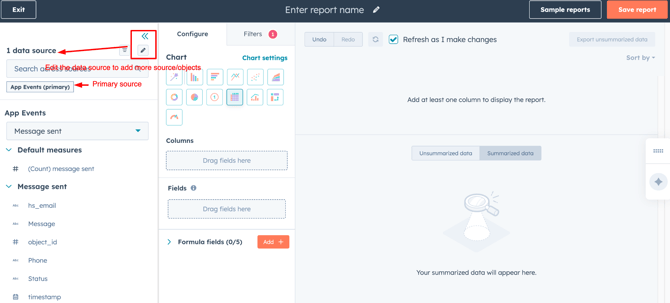
-
From the "Configure" section of the report, choose your visualization type(Bar chart/pie/table, etc) - a donut chart works well for lifecycle stage breakdowns.
-
In the "Break down by" section, select "Lifecycle Stage" to segment your data
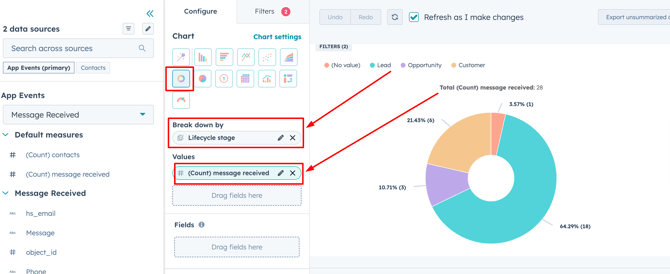
- Select "(Count)Message received" in the values section to see the number.
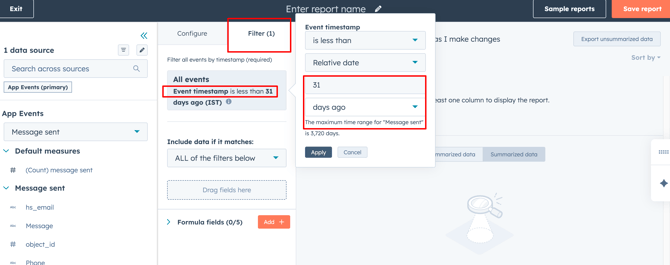
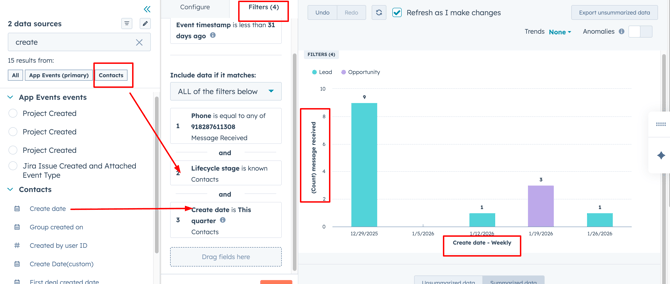
- In the Filter section adjacent to "Configure", add timestamp to adjust the time.
Creating Your First Report: Messages by Lifecycle Stage
One of the most valuable reports you can create is analyzing WhatsApp messages across different contact lifecycle stages. This helps you understand which segments of your audience are most engaged with your WhatsApp communications.
Step 3: Customize Your Report
You can further refine your report by:
-
Setting date ranges to analyze specific time periods
-
Adding filters to focus on particular contact properties
-
Choosing custom colors for your visualization
-
Adding comparison metrics to track changes over time.
Step 4: Save and Name Your Report
Once you're satisfied with your report configuration:
-
Click the "Save" button in the top right corner
-
Give your report a descriptive name (e.g., "Vira WhatsApp Messages by Lifecycle Stage")
-
Choose where to save it - either to a dashboard or as a standalone report
Best Practices
-
Regularly review your reports to identify trends and opportunities
-
Combine Vira event data with other HubSpot data sources for comprehensive insights
-
Set up scheduled report emails to keep your team informed
-
Use filters to segment data and drill down into specific audiences
-
Create dashboard views to monitor multiple metrics at once
Conclusion
Vira App Events reporting in HubSpot gives you the visibility you need to optimize your WhatsApp communication strategy. By creating custom reports, you can make data-driven decisions about your messaging approach and better serve your contacts through their preferred communication channel.
Having troubles?
File a Support Ticket or Book a call!